Nail skill decides which of these 19 sets is yours, not taste: the list runs from a Skittle manicure with one polish per nail, or a single toothpick dot near the cuticle, to sculpted acrylic tacos, corn on the cob and roses that call for a salon visit or a full evening at the desk.
Striping tape and a steady hand cover the middle, and press-on sets or water decals stand in when a liner brush feels risky.
1. Cactus Nail Art
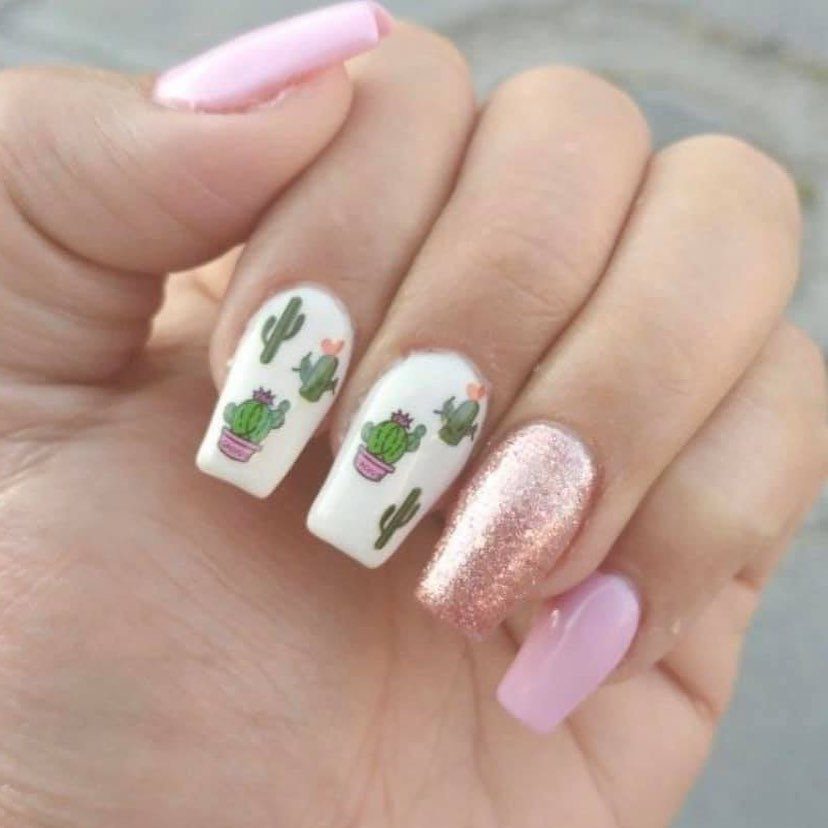
A potted cactus is about the easiest Cinco de Mayo motif to paint, because it is just a few simple shapes. 2 accent nails carry the whole idea here, and the rest stay pink and white.
Pick one or two fingers for the cactus and leave the others plain or glittery.
Paint the pot rim with a thin brush and a small dab of white polish. Green cactus on a white base stays easy to read from across a table.
2. Sugar Skull Nail Art
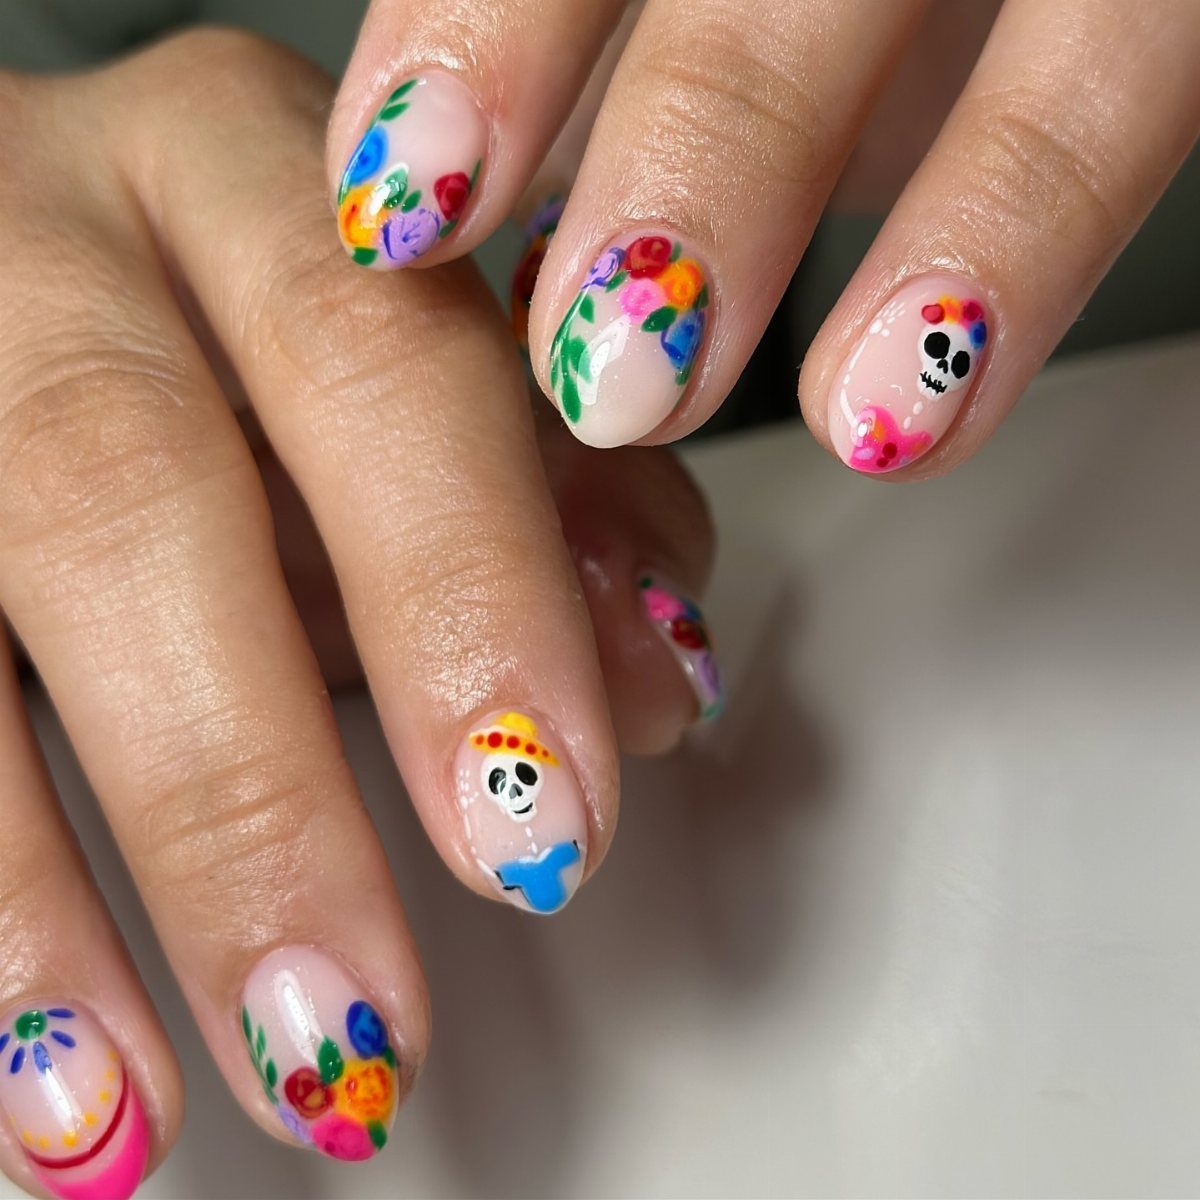
Sugar skulls look intricate, but the nail version lives on a nude base, which makes every hand-painted petal and skull outline pop. Almond nails give the designs room to breathe.
I would paint the flowers first and the skull on one or two nails only.
Skulls on every finger get crowded fast, so a steady liner brush matters more than a big range of colors. This one suits patient painters or a nail tech with a reference photo.
3. Mexican Flag Nails
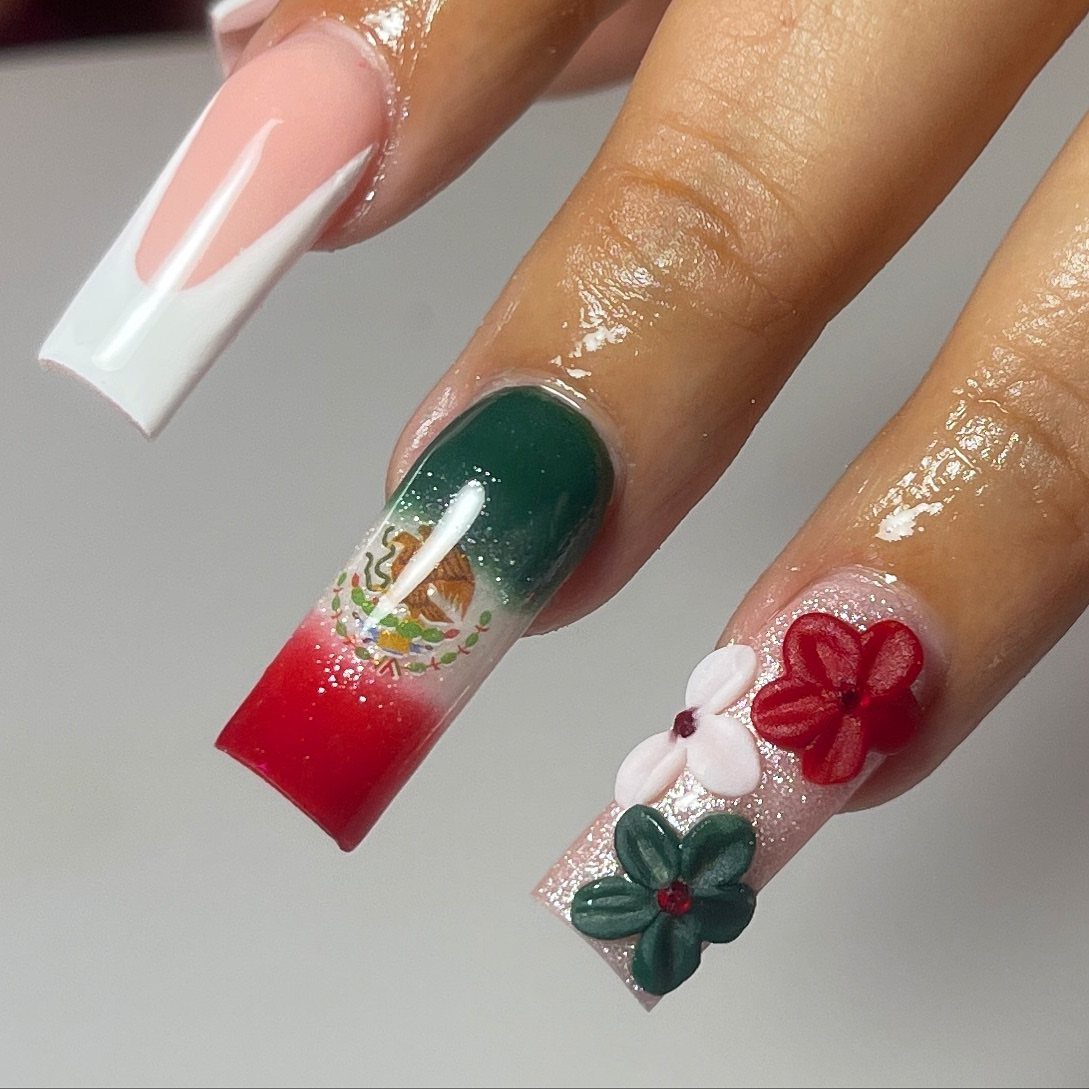
Most flag manicures are 3 flat stripes. A gradient from green through white to red, finished with a white French tip, looks far more grown-up.
Sponge the three colors onto the nail in soft bands, then add a small emblem on one accent finger.
Tiny 3D flowers in the same green, white and red tie it together, though they add bulk and snag easily. Skip them if you type all day.
4. Floral Nails
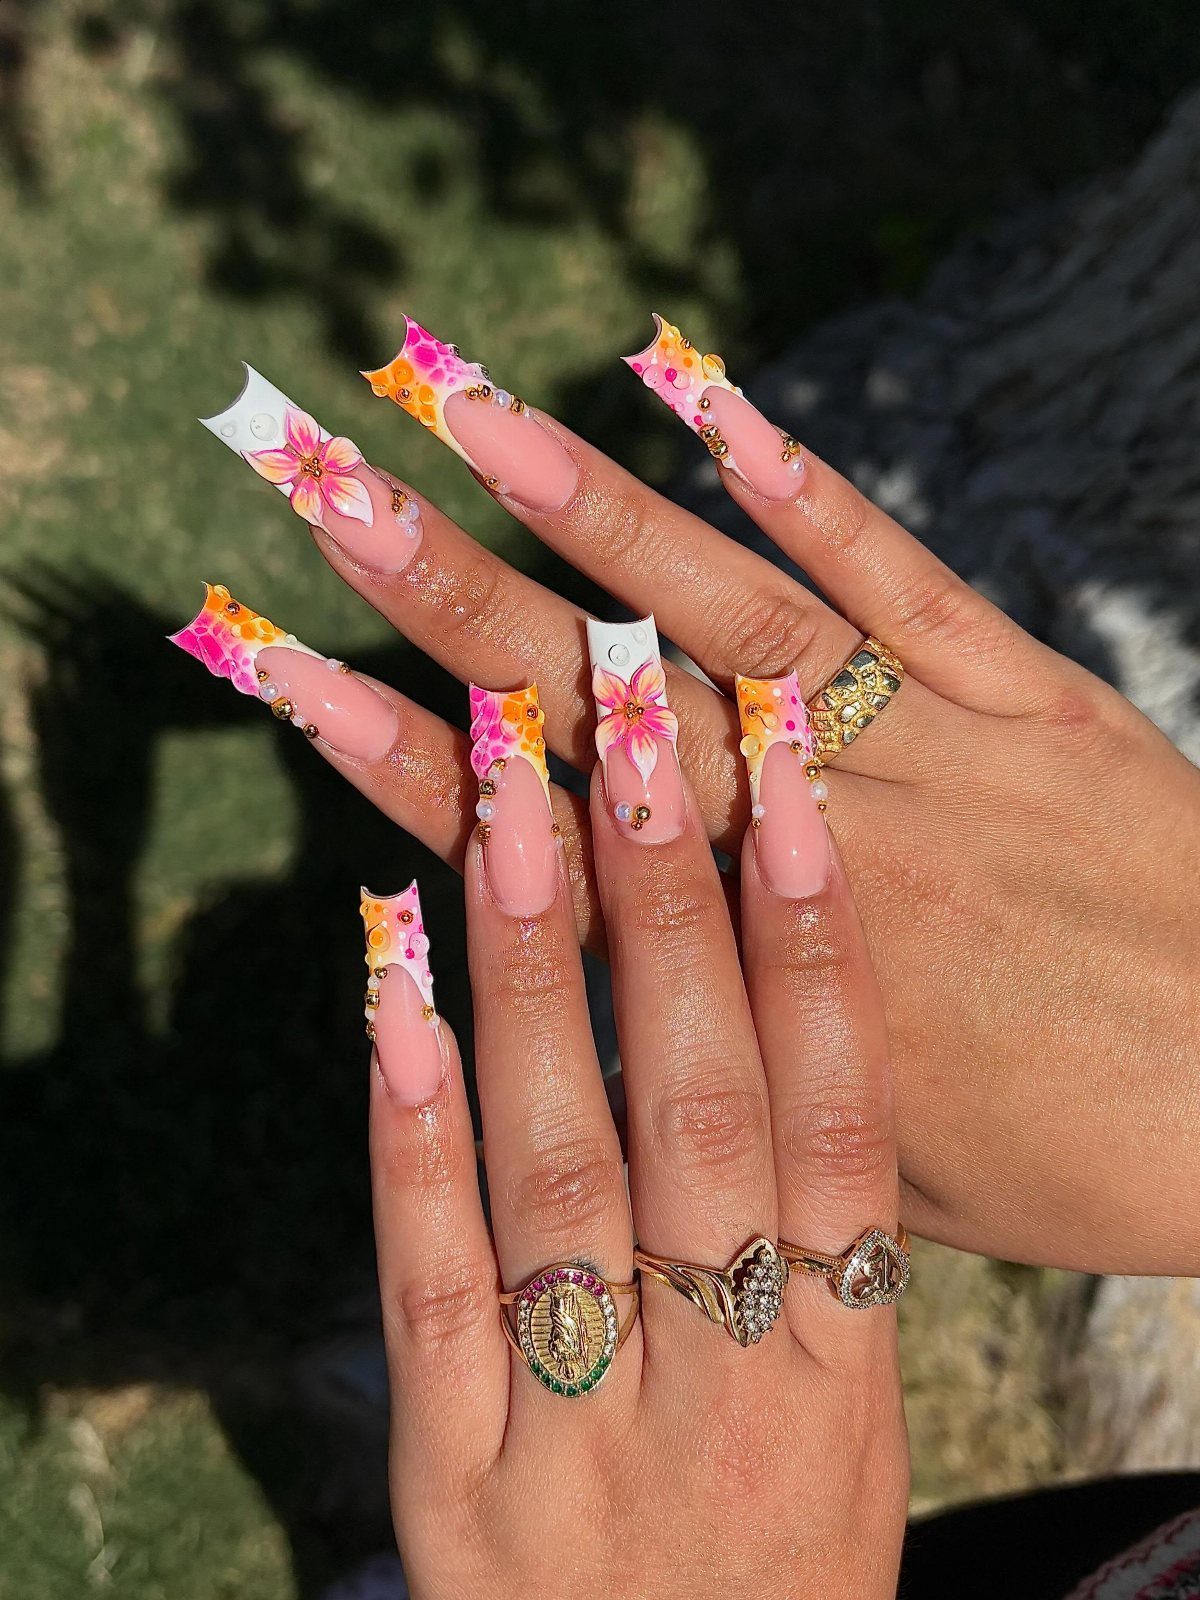
Pink and yellow flowers on long coffin nails have plenty of room to spread, which makes this design a good fit for that shape. Large blooms read well even on a quick glance.
Start with a pastel or sheer base, then dot petals in a bright pink and a sunny yellow, and finish each center with a contrasting dot.
Gold rings echo the look nicely. Press-on sets are a fair shortcut if freehand florals feel risky.
5. Color Block Nails
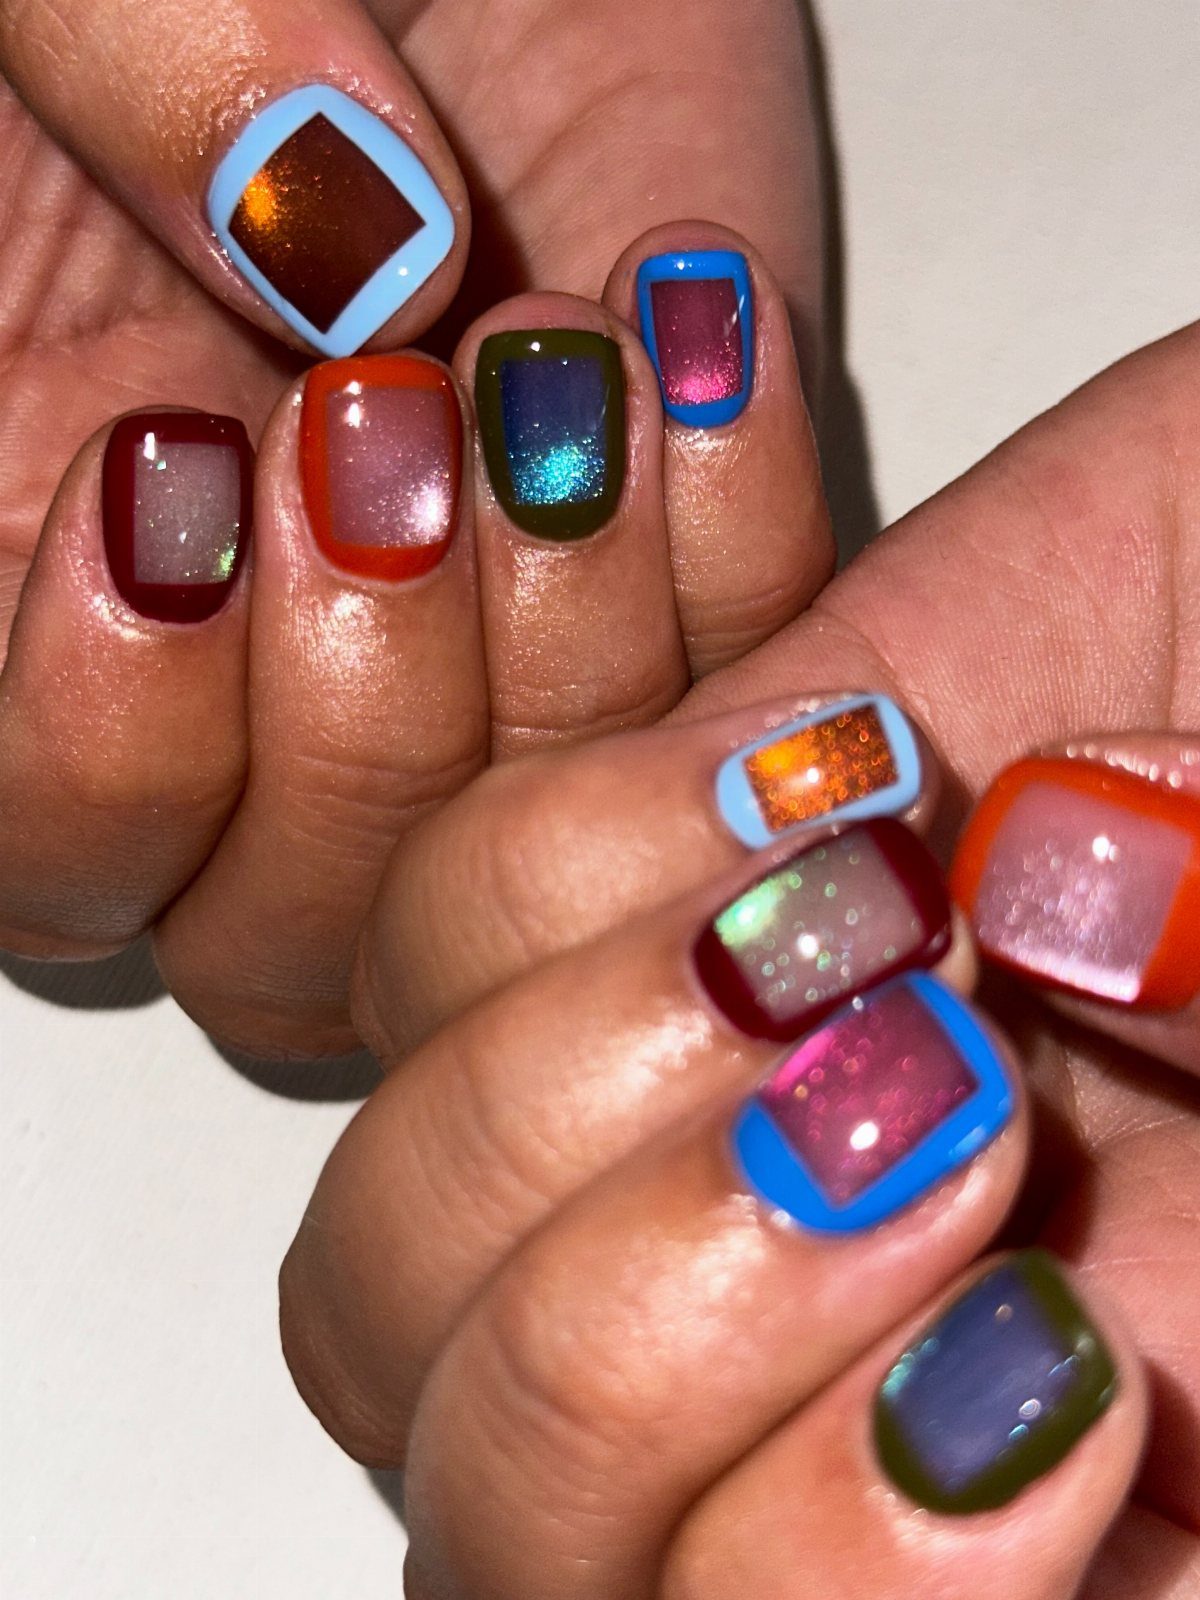
Square nails suit color blocking best, since the flat edges give straight lines something to follow.
Painter’s tape or thin striping tape keeps the borders crisp.
Paint the border colors first, let them dry fully, then fill the center with a metallic polish. I like using a different border color per finger; it looks planned, not random.
6. Serape Stripe Nails
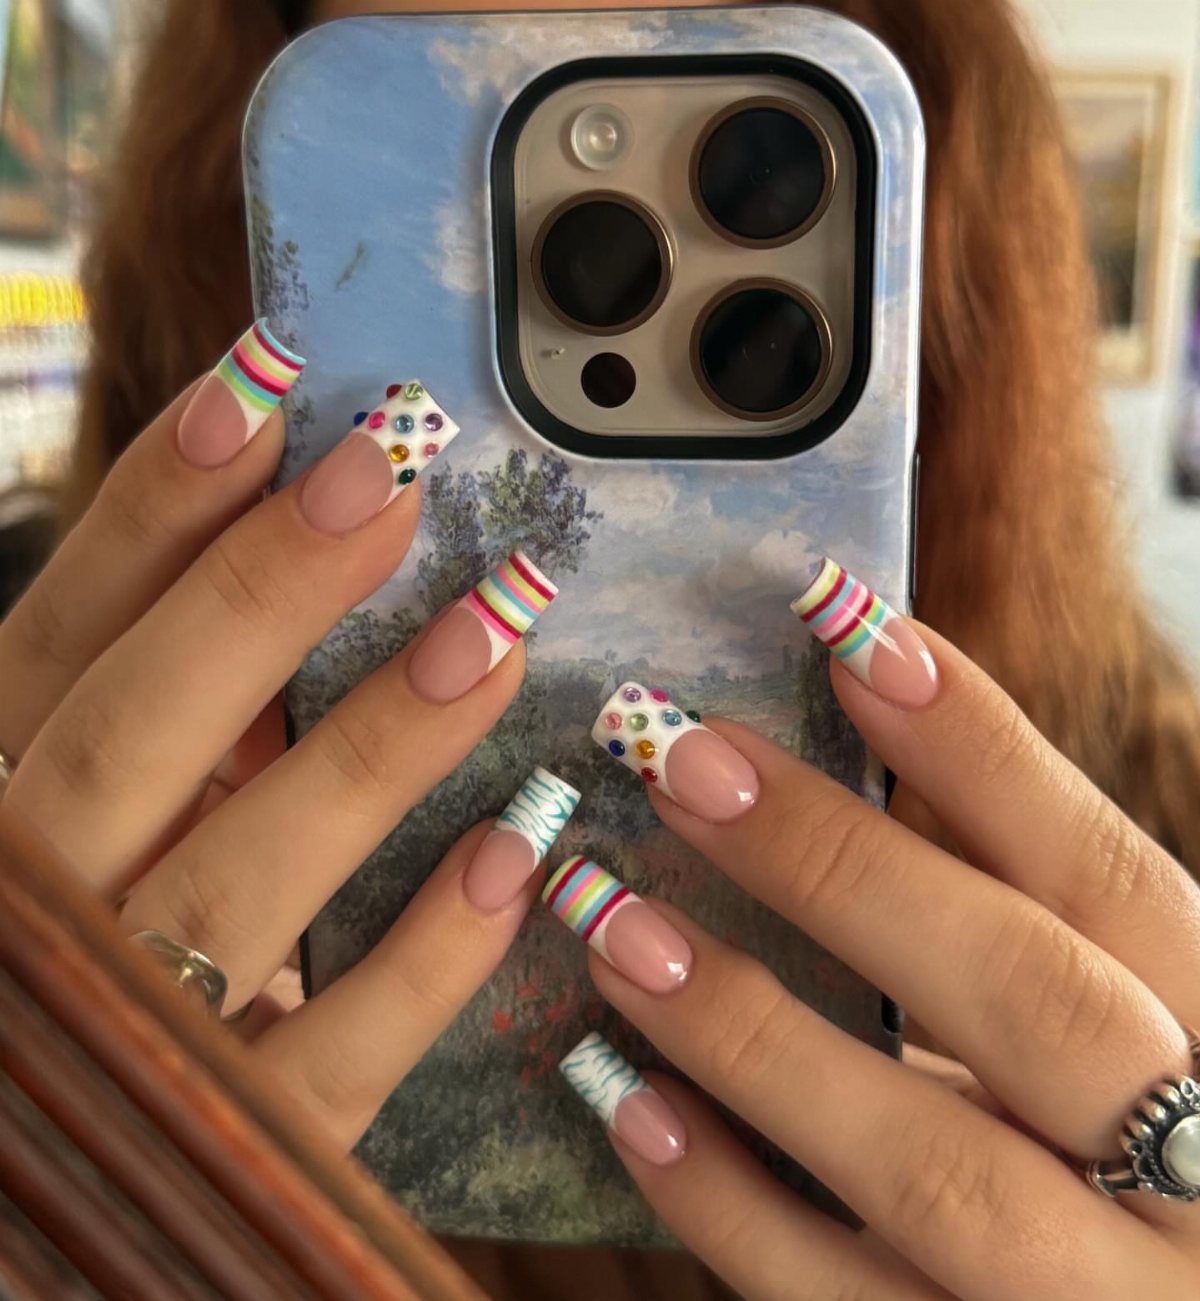
Serape stripes are the easiest design to start with: horizontal bands in bright colors, no freehand drawing required. A natural nail base keeps it light and lets the stripes do the talking.
Use striping tape or a thin brush, and vary the stripe widths so it feels woven.
A few rhinestones tucked between bands add sparkle without extra work. Dry each color fully before the next, or the lines will smudge.
7. Taco-Inspired Nails
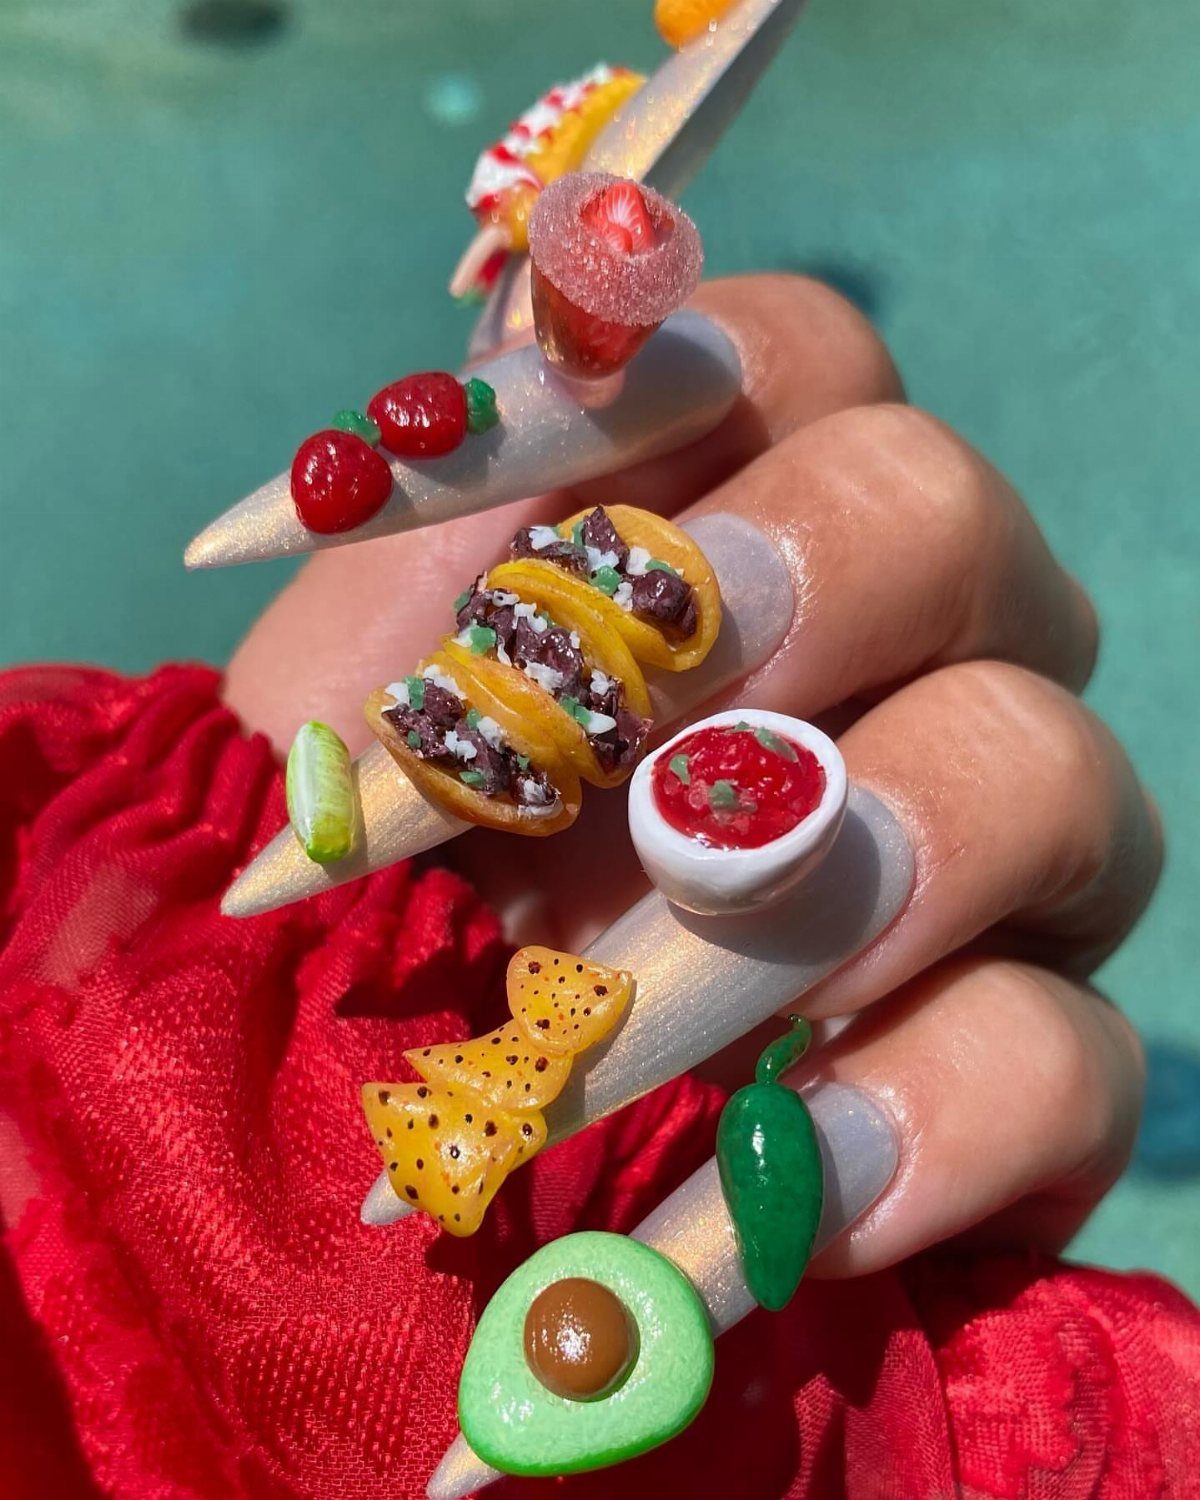
Tiny 3D tacos on long, pointed white nails are sculpted work, and the white base keeps the fillings readable: salsa, avocado and peppers each get their own spot.
Build the pieces from small dabs of colored gel or acrylic, one nail at a time, and cure or dry each before adding the next.
Press-on sets save hours if you don’t sculpt. Raised pieces snag on hair and sweaters, so I’d keep them to a few accent nails.
8. Margarita-Inspired Nails
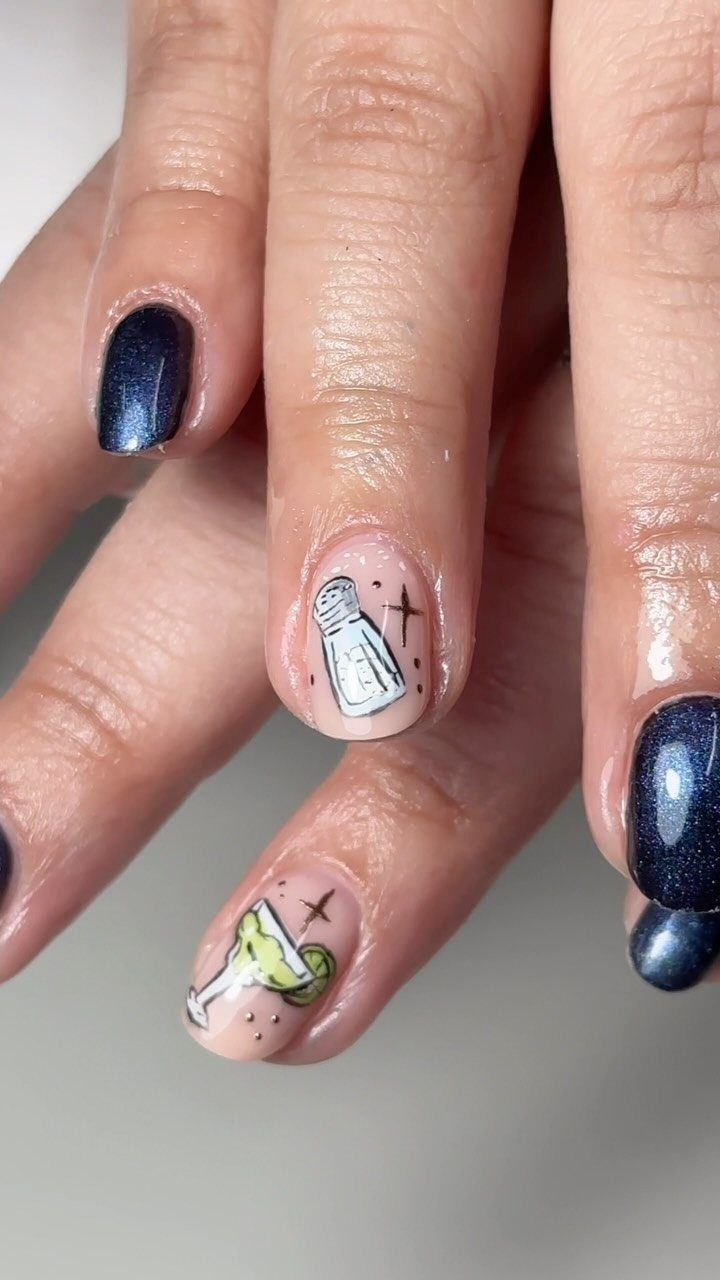
A margarita glass with a lime wedge, painted next to a salt shaker on dark blue nails, turns the drink into a tiny scene. Blue makes the white salt and green lime stand out.
Paint the drawings on one or two accent fingers and leave the rest solid navy.
Use a fine liner brush after the base coat has dried completely. The creator of this set says it was inspired by a design from 10 years ago, which is a good reminder that a classic motif can be redone.
9. Talavera Tile Nails
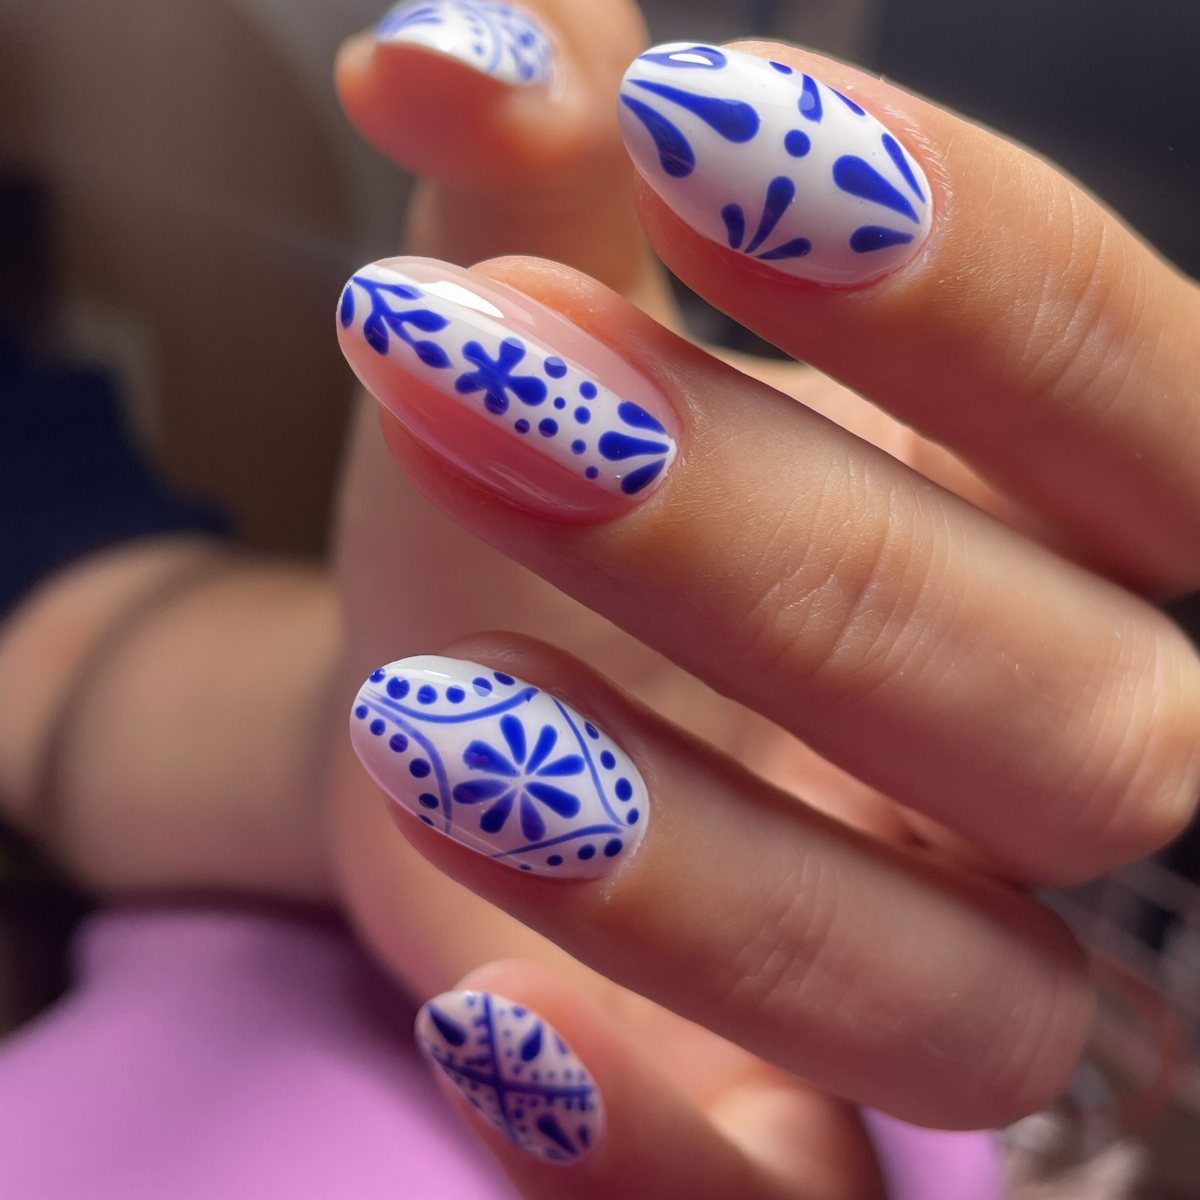
Blue and white florals plus geometric borders on long oval nails borrow straight from Talavera tile, and the two-color palette does half the work for you.
Start with a white base, then paint the blue designs with a thin liner brush, working from the center of each motif outward.
Repeating one flower across several nails looks more like a tile set than mixing multiple designs. Stamping plates or water decals are fair shortcuts if freehand feels shaky.
10. Sunshine Yellow Nails
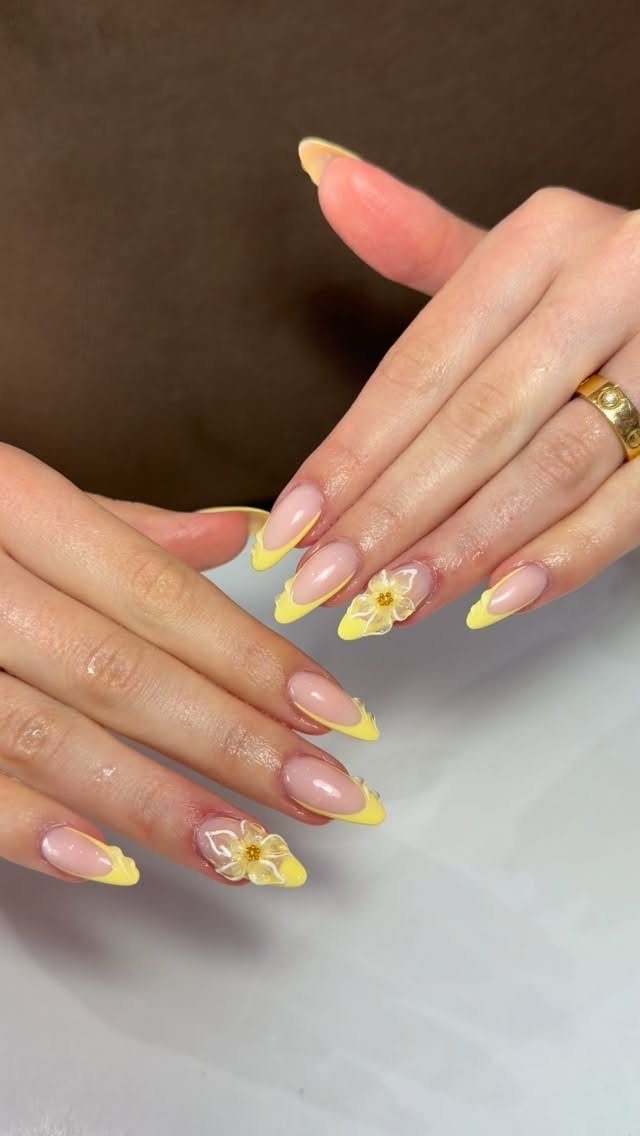
Yellow is the surprise at a fiesta, and it works because it is the brightest color on the table without competing with red or green. Bright yellow French tips on almond nails make a clean, sunny base.
Paint the tips with a thin brush, or use tip guide stickers for a steady curve.
I would add the 3D yellow flowers to just one or two nails, since raised petals catch on everything. Skip them for a flatter, easier version.
11. Fiesta Color French Tips
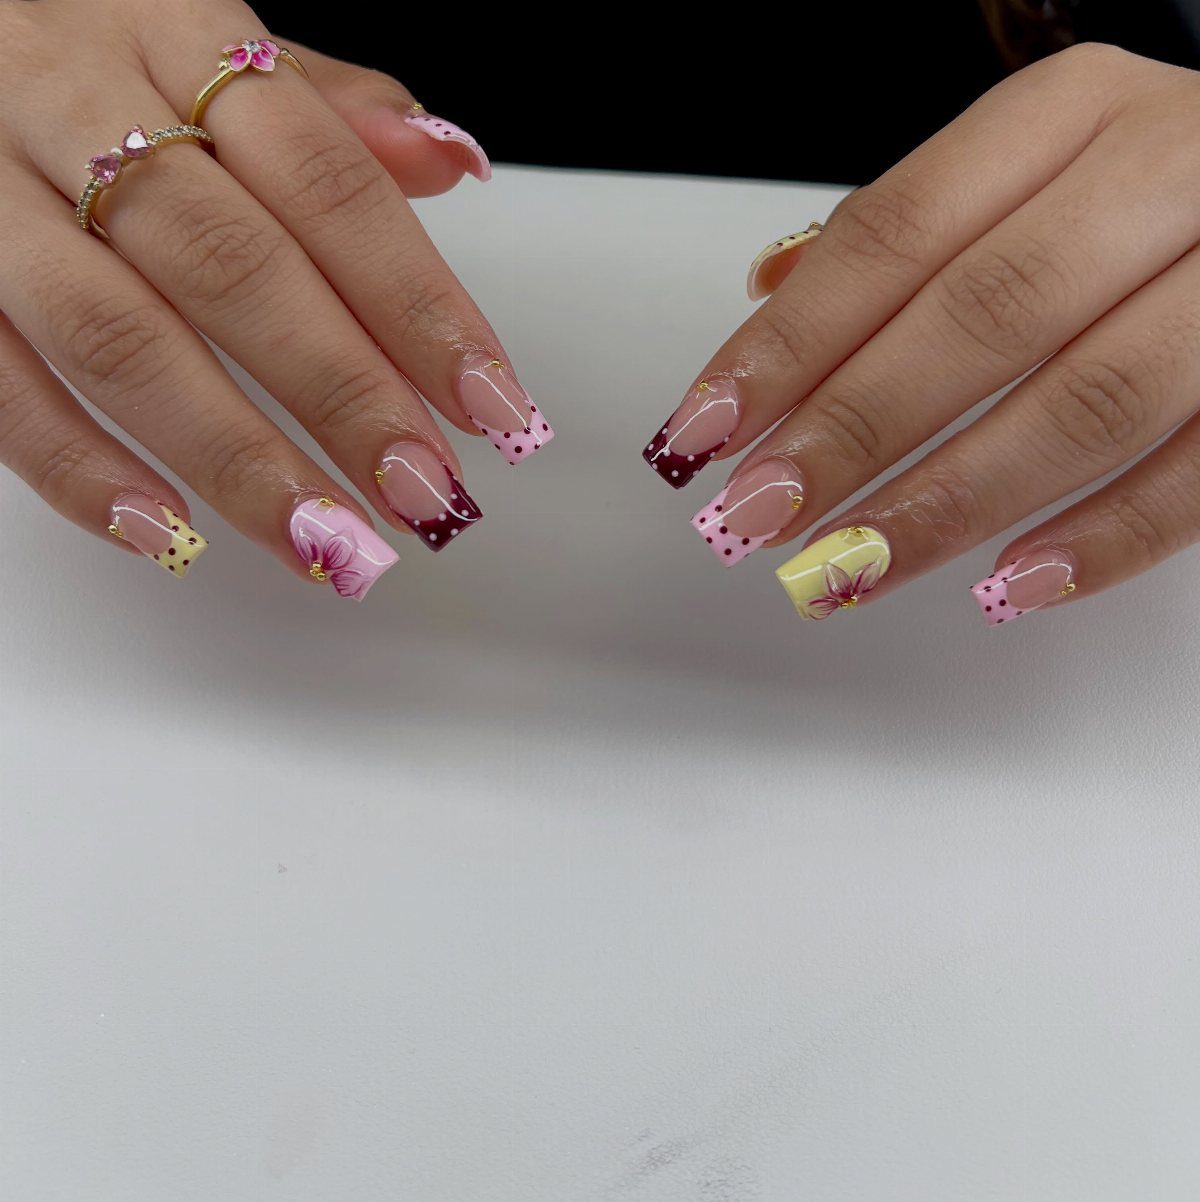
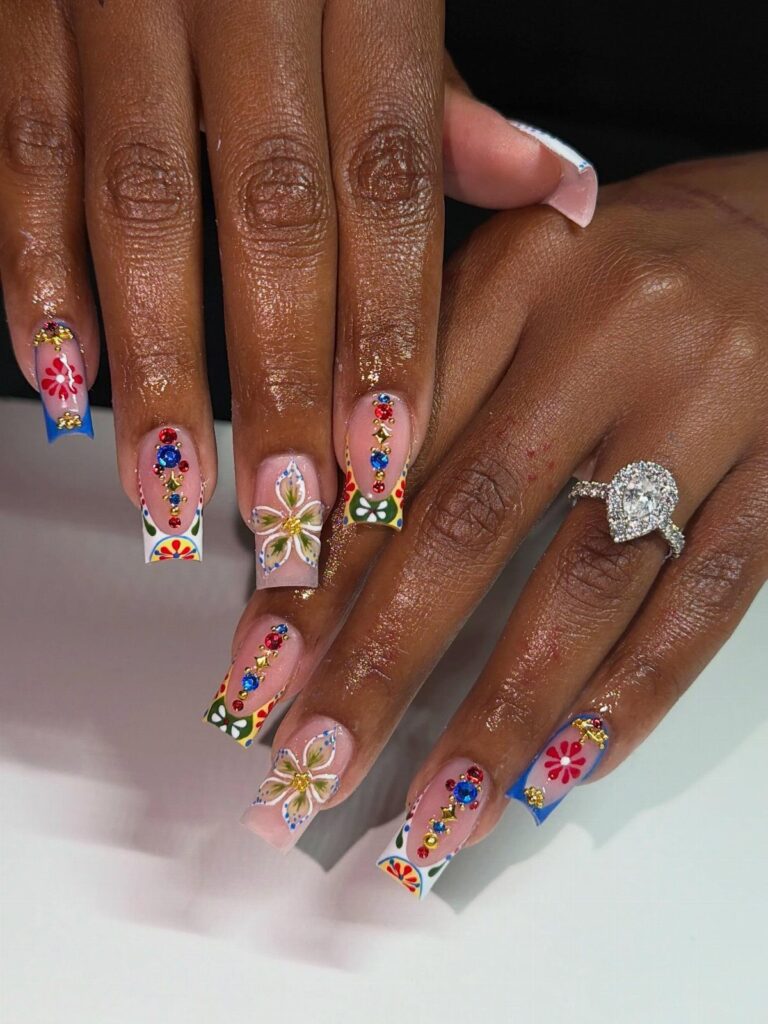
Swap the white of a classic French tip for a mix of bright colors and the manicure suddenly fits a party. Gold beads and small florals give it extra polish on almond nails.
Pick a different tip color for each finger, or repeat two or three in a pattern.
Paint the tips first, then place tiny flowers and gold beads with a dot of top coat. Keep the art to one or two accent nails; the colored tips already do plenty.
12. Papel Picado Nails
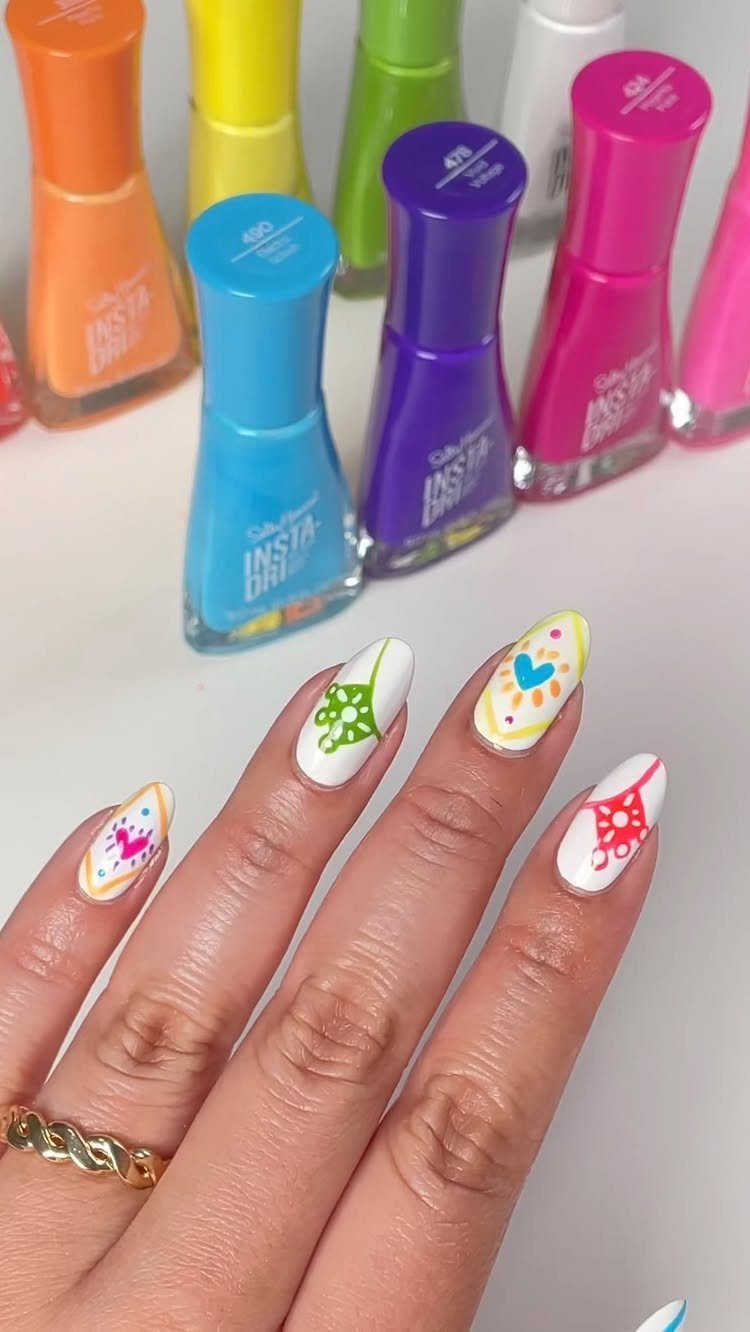
Papel picado banners are cut paper in rows of bright shapes, and on a white base those shapes look just like the paper strung overhead.
Paint small triangles, scallops and dots in a different color per nail, using a thin brush.
A quick-dry polish helps when you layer colors, since each one needs to set before the next goes on. Start with white and keep the patterns simple.
13. Chili Pepper Nails
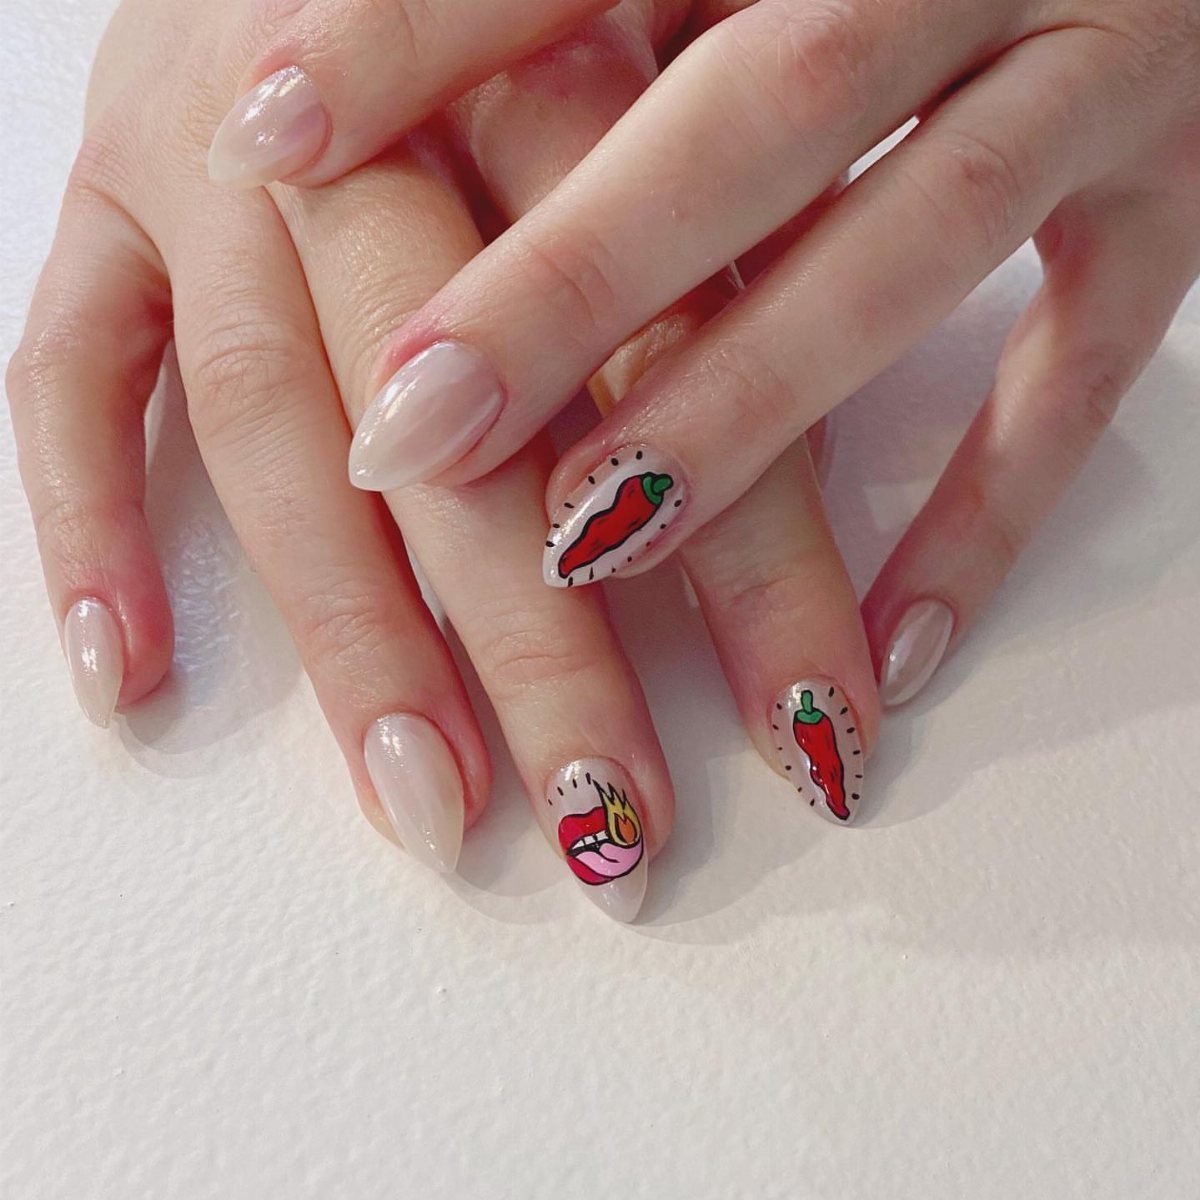
Red chili peppers painted on a neutral base keep the color doing all the talking. Almond nails give a pepper a natural curve to follow, and a flaming lip design adds a little heat.
Paint the pepper body in one or two strokes of red, then add a thin green stem with a fine liner brush. 3 accent nails are plenty; leave the others bare.
A sheer nude base forgives wobbly lines better than white does.
14. Lotería Card Nail Art
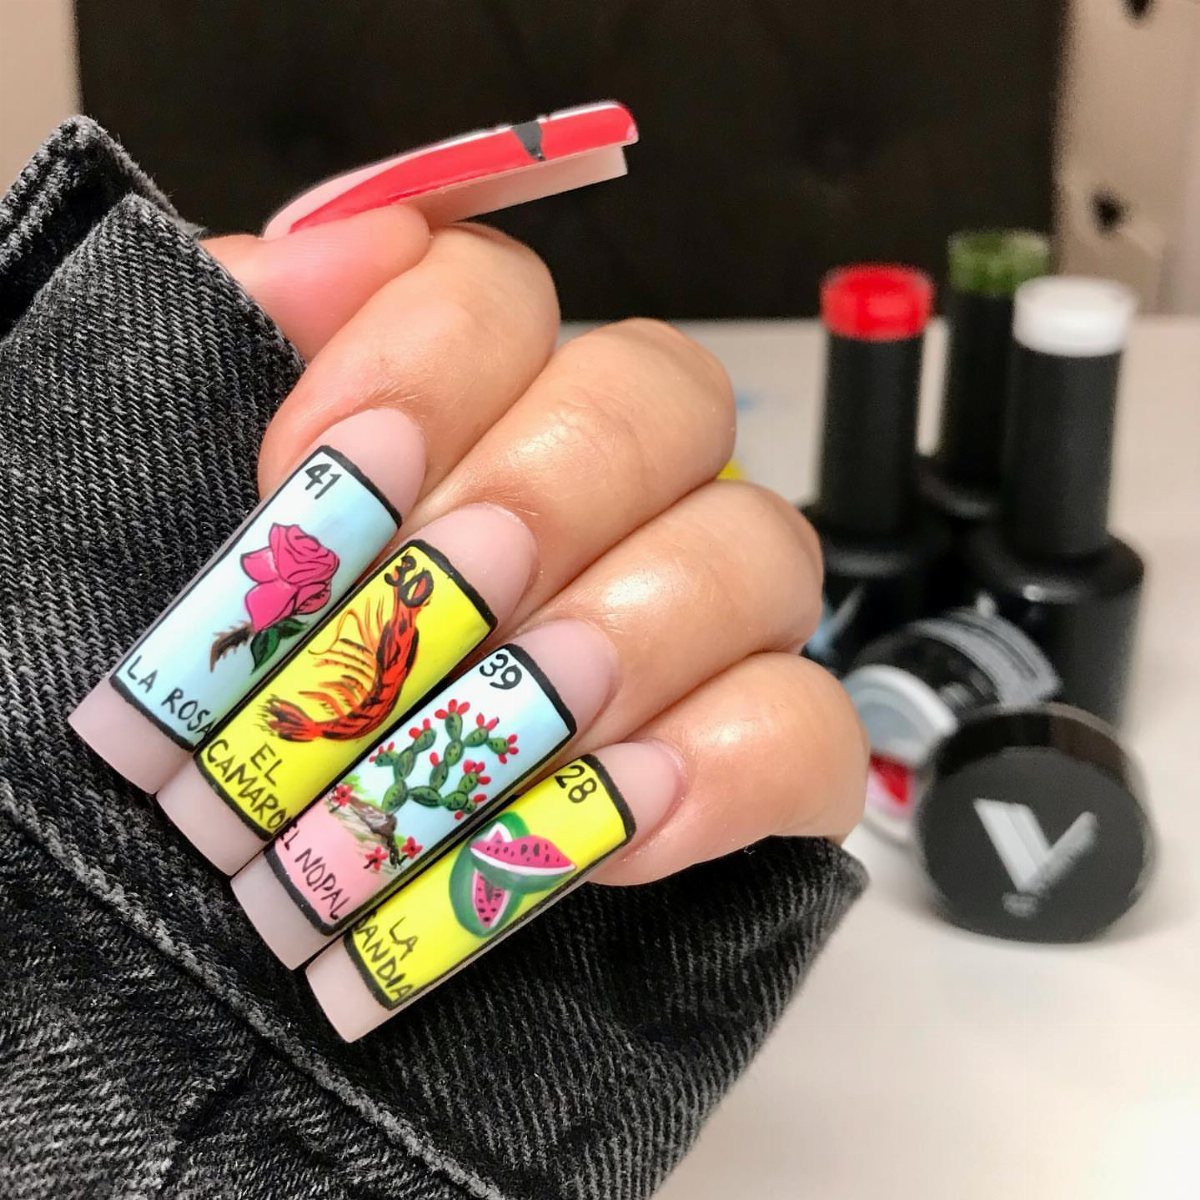
Each long nail becomes its own Lotería card here: a rose, a shrimp, a cactus and a watermelon, one image per finger.
Pick a handful of cards you love and sketch each in pencil-thin lines with a liner brush before filling in color.
Long nails give the most room, since a card needs space for its small details. Give each nail a cream or pale base so the drawings read like printed cards.
Water decals are a fair shortcut if you don’t trust your hand at this scale.
15. Lime Slice Accent Nails
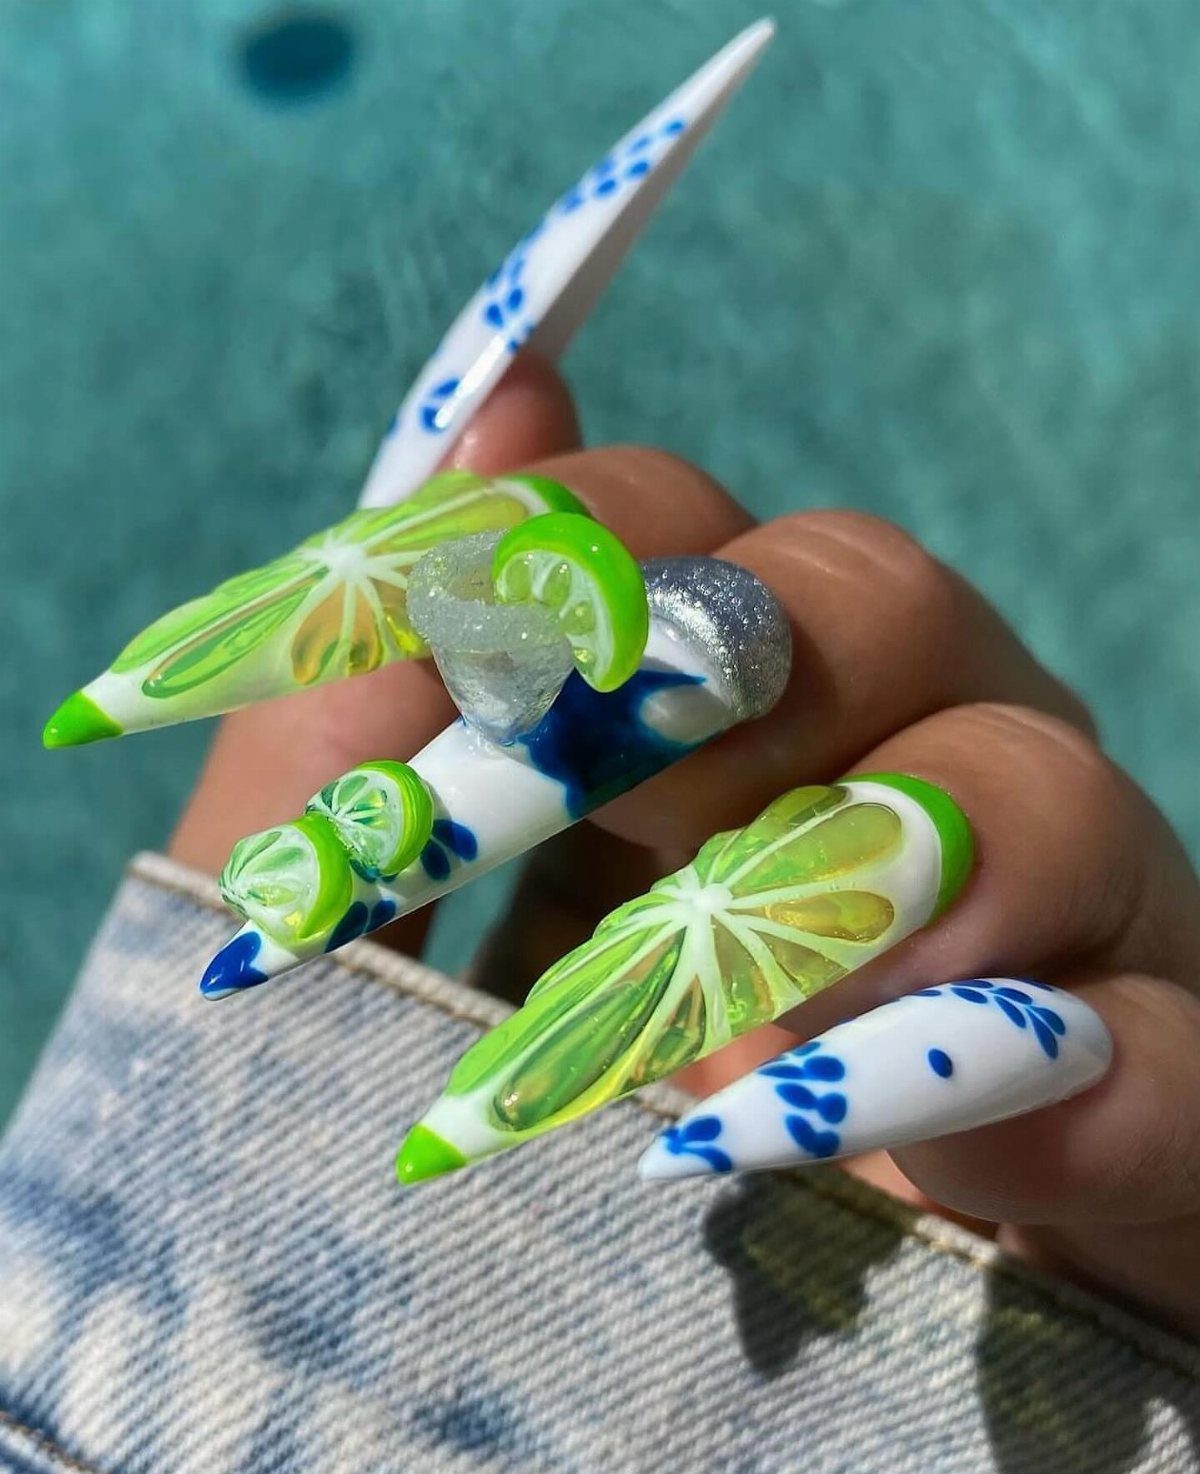
Lime slices are about as simple as fruit gets: a green circle, a paler ring, and thin white wedge lines. On long, pointed acrylic nails, a single 3D lime charm adds a dimensional touch.
Paint the slices on select nails and save the charm for one finger.
Blue floral patterns on the remaining nails make a good partner for the green. Set the charm in a dab of builder gel or strong nail glue, then seal around it with top coat.
16. Tequila and Bunting Nail Art
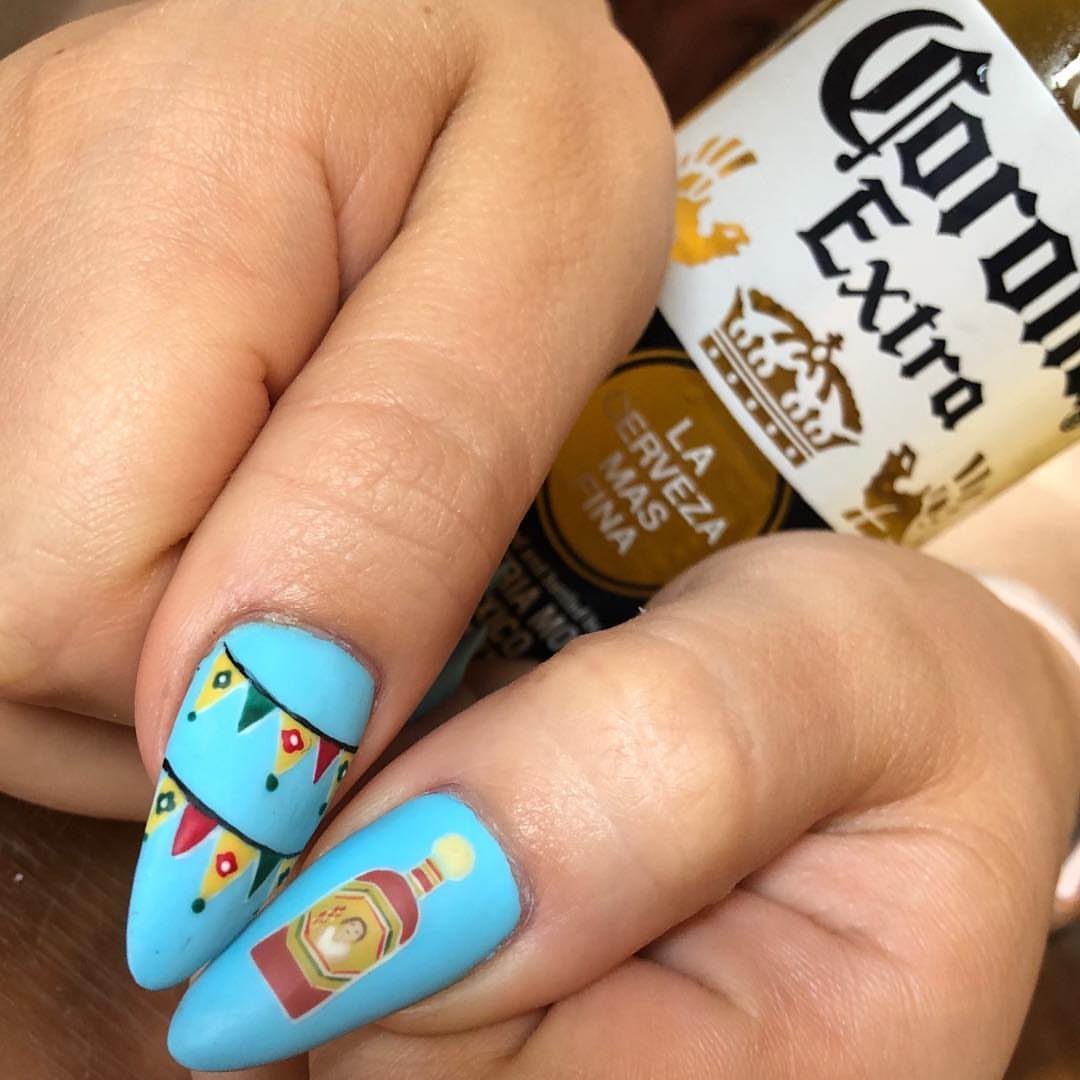
Light blue matte nails with painted bunting flags and a mini tequila bottle read like a tiny party. The matte finish keeps the small flags soft instead of shiny.
Paint the bunting as a drooping line across the nail, then add little triangles in different colors.
Put the tequila bottle on one accent nail. Apply matte top coat last, because glossy top coat will undo the look.
Keep the flags small and the colors few, or the nail turns busy.
17. Skittle Rainbow Manicure
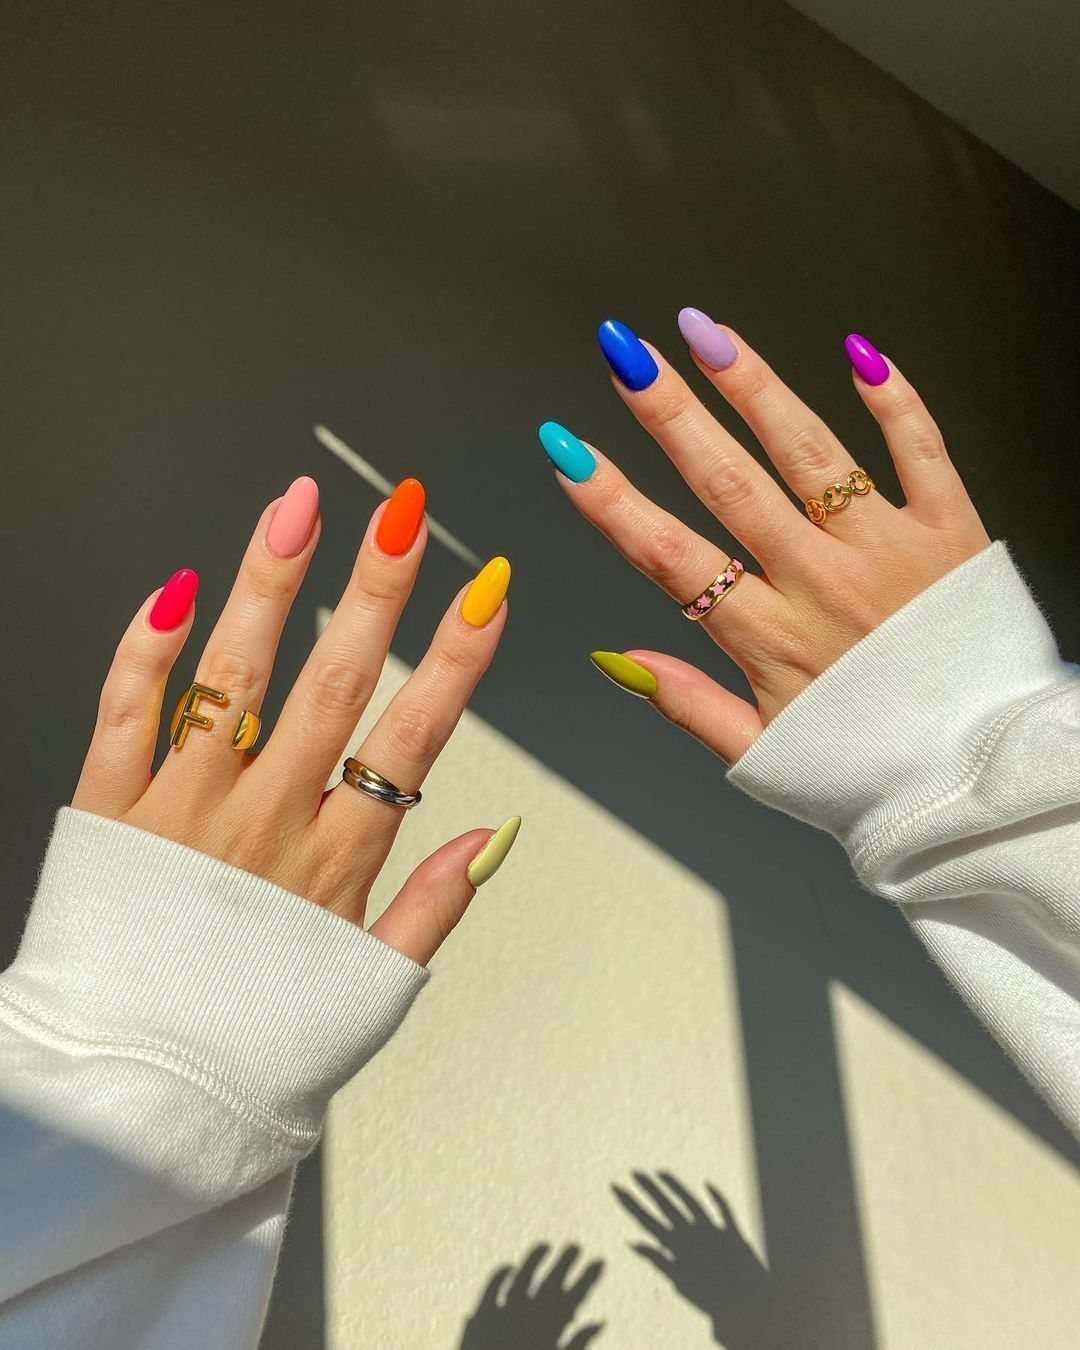
A Skittle manicure gives every finger a different bright shade, so it is the least fussy design on this list. Almond nails show the color well.
Choose polishes that sit well together and paint one per nail, or mix them up between hands.
2 coats each give the most even color. Gold or silver rings look good with it, and I would skip nail art entirely, since the colors are the whole design.
It is also the easiest option for beginners.
18. Minimalist Colorful Dot Nails
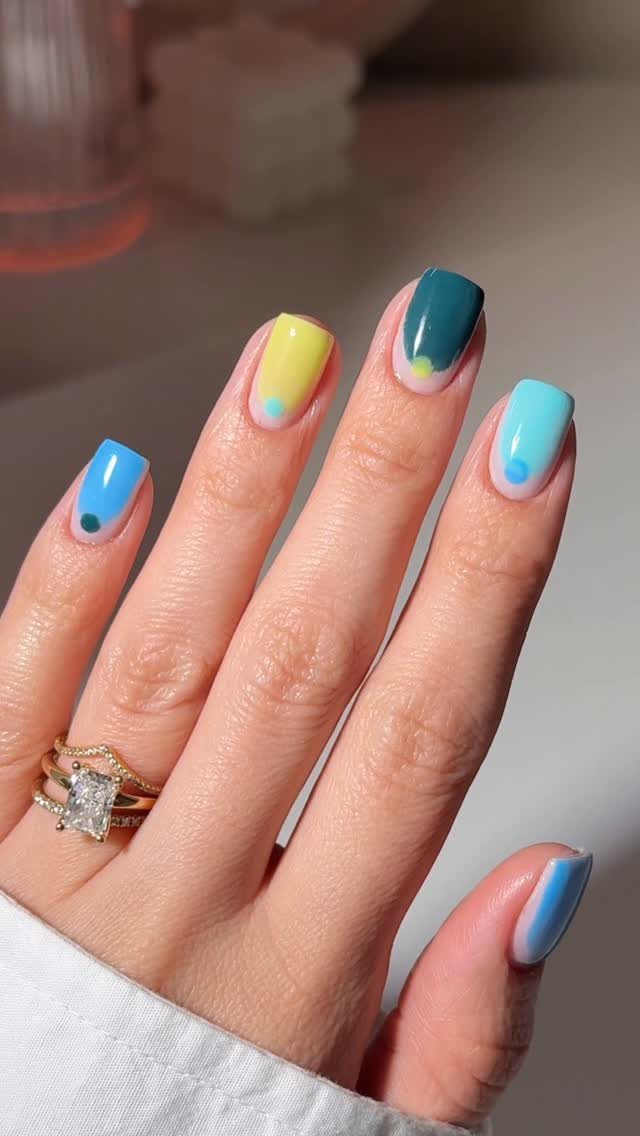
One tiny dot near the cuticle is all that separates these teal, blue and yellow nails from plain color, and that restraint is what makes them work.
Paint the base, let it dry fully, then touch a toothpick or the tip of a bobby pin to the cuticle area for a contrasting dot.
Pick a dot color that differs from the base: yellow on teal, say, or blue on yellow.
It takes minutes, and gold rings fit right in. This is the one I would hand to a first-timer.
19. 3D Mexican Street Food Nails
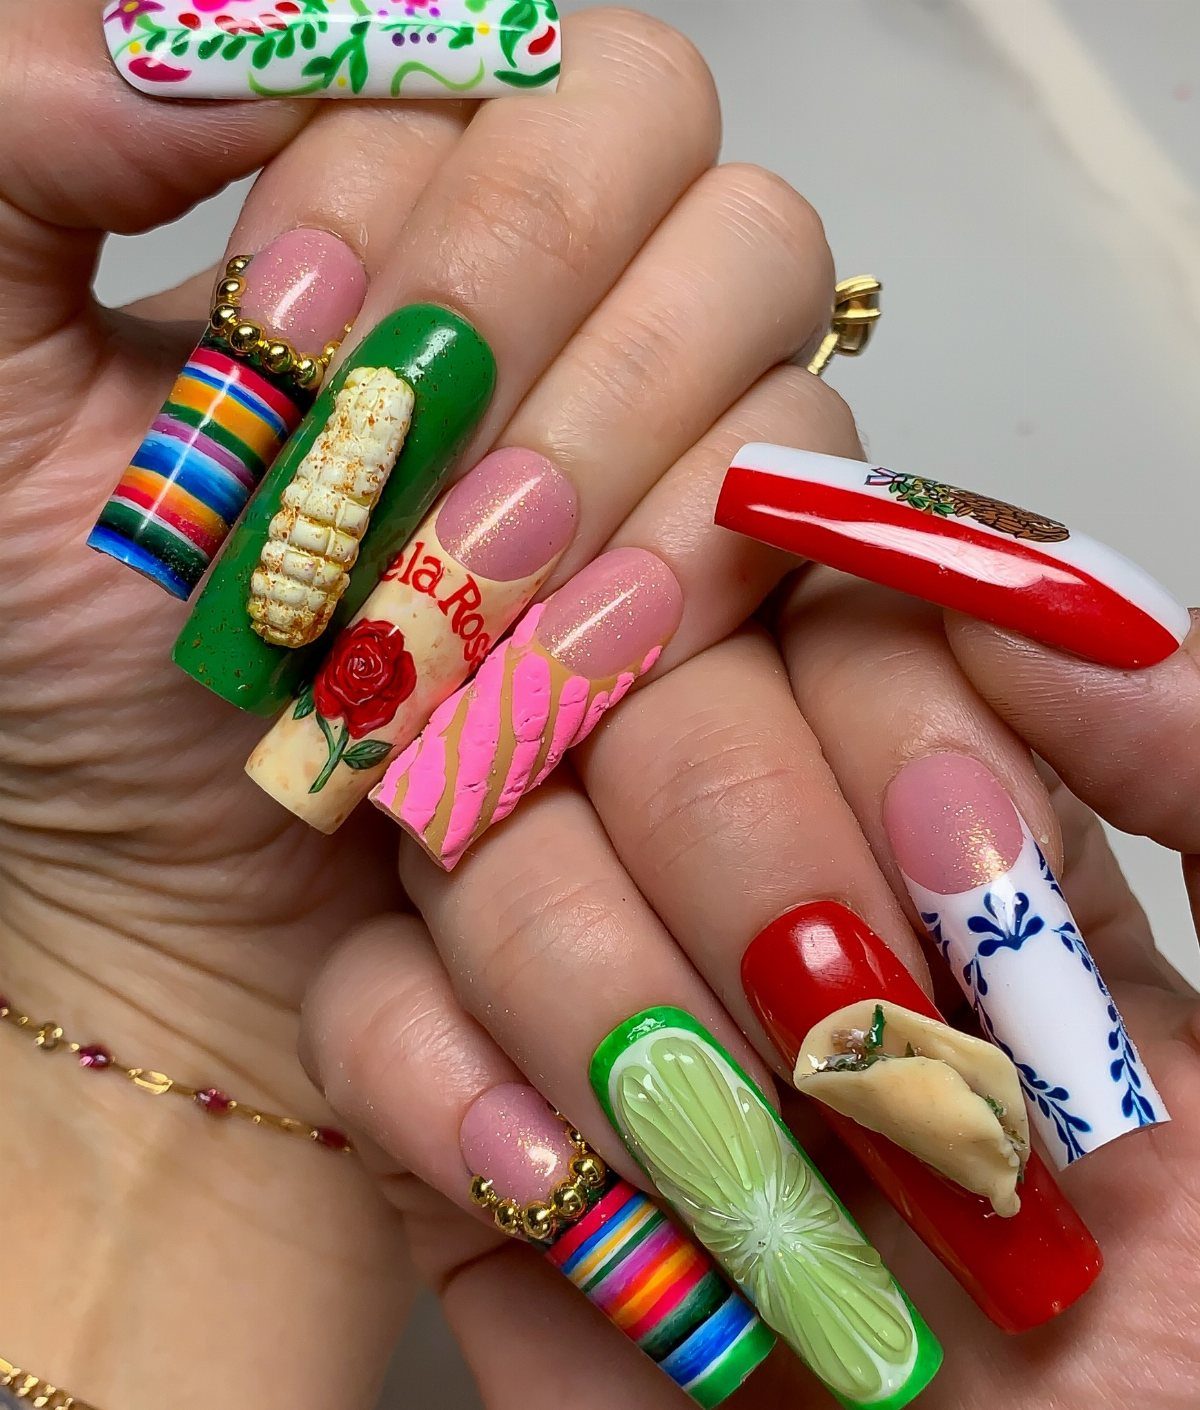
Sculpted tacos, corn on the cob, lime slices and roses make this the most hands-on set on the page, and long coffin acrylics give each piece a flat, wide surface to sit on.
Colorful stripes between the food keep the nails from looking like a pile of tiny props.
Sculpt each piece from acrylic or gel, one nail at a time, and cure or dry it before starting the next.
Press-on sets are the sensible route if you don’t sculpt, and a nail tech can work from a reference photo.
I’d plan on a salon visit or a full evening at the desk. Raised pieces catch on hair and sweaters, so lettering and stripes can fill the quieter fingers.
Best Colors for Cinco De Mayo Nails
Red, green and white are the base of any Cinco de Mayo manicure, since they match the Mexican flag. Yellow, deep blue and fiery orange work as festive extras when you want more than the flag trio.
Choose a single lead color for the most nails, then bring in the others as accents on one or two fingers.
Orange next to red looks hot and loud, so give it its own finger instead of a place beside a red nail.
Deep blue is the calmest of the extras, and it cools down a hand that is already full of red and orange.
Tips for Lasting Nail Art
A good base coat goes down first, since it grips the nail and gives the color something to hold onto. It gives the color something to grip, and it is the step people skip most often.
Two or three thin layers dry harder and smoother than one fat coat, which tends to bubble and peel at the edges.
Thin layers dry through, resist smudging and chip less. Then seal everything with a durable top coat, running it over the free edge of the nail.
After that, protect the work.
Long baths and dish duty soften polish, so keep soaks short and pull on rubber gloves for cleaning. A manicure done for the party should still look good when the party is over.
Easy Designs for Beginners
Beginners do best with the lowest-risk techniques: simple color-blocking, striped accents or floral decals. Each one leaves little room for a shaky hand to show.
Stickers and stamping tools are worth trying too, because they produce detailed designs without any drawing.
For color-blocking, use one solid color per nail, or alternate colors across the hand.
Red, white and green need nothing beyond 3 polishes and a steady hand. I would buy the tape before buying any fancy brush.